"Brenda didn't return from her lab last night. Its not like her to stray off. Especially not under these conditions. I knew I shouldn't have let her go back to work! I told her it was too dangerous! You have to drop everything and find her, immediately!" -Jack
Brenda has turned up missing, and Jack demands that you stop everything to find her.
This quest will only become available after Brenda's lab in Sector 28 has been retaken and she has gone back to work, and only then if the enemy manages to retake her lab, and the day ends with the lab still in enemy territory. After this, Brenda will fail to return and Jack will come to you with the mission.
It is of note that if you take too long finding Brenda, when you do find her she will be dead. This nets no reward for the completion of the quest, and also prevents access to several quests later in the game, such as the recovery of her notes, as it is required that she be present for those quests to take place. How long you have to rescue her depends on the difficulty level: On Easy difficulty you have 10 days to rescue her, you have 8 days on Medium difficulty and 6 days on Hard difficulty.
Preventing Brenda's Capture
"She's not cooperating. We're going to have to get rid of her... Soon!"
Due to the timed nature and the potential length of this quest, as well as any other unrelated problems that may crop up at the same time (processing plant recapture, financial woes, conflicting mercs relationships, wounded mercs...) you may want to prevent Brenda's capture from happening for as long as you can until you are confident you can pull this one off successfully.
Once you capture Sector 28 and Brenda returns to work, recapturing this sector will become your enemy's top priority and every day the enemy will try to recapture it, sometimes more than once a day. As such, you should keep eight guards in this sector at all time. Should this sector falls into enemy's hands regardless, recapturing it before the end of the day will prevent Brenda's capture. It is also a good idea to capture enemy sectors from early morning until mid afternoon and reserve the last three or so hours of the day to defend or recapture Brenda's laboratory.
It is also possible to entirely prevent this quest from happening if you successfully defend Sector 28 until all adjacent sectors have been captured. Although you will not receive the reward associated to this quest if Brenda isn't captured in the first place, and Brenda will not mention her abduction in the ending cutscene, the fact that Brenda is still alive will nonetheless allow you to partake in some quests later on.
Finding Brenda

"They ain't never gonna find her. She's locked up good just off the coast."
Begin your search at Brenda's lab, in Sector 28. Throughout this mission, you will find bloodied clothing items that will give hints as to which direction the enemy has taken her. In Sector 28, you'll find a lab coat, deposited just outside the western door. Inside one of the lab coat's pocket is a note written in lipstick that Brenda left behind for your men to find. The note says she's being taken to a small island.
A quick look at the map screen reveals there are five possible sectors that fits Brenda's description: Sector 7, 24, 33, 53 and 55. Although 95% of the time, Brenda will be held prisoner in Sector 24, she can also be held in any of these four other sectors if you're already in control of Sector 24 when she gets kidnapped. Two additional pieces of clothing can be found to help you narrow down the sector where Brenda was taken to.
A bloodied blouse can be found in a sector adjacent to the sector where Brenda is held prisoner. Brenda will be held in: (Please note that there is some overlap)
- Sector 7 if the bloodied blouse is found in Sectors 26, 17, 16, 15 or 6
- Sector 24 if the bloodied blouse is found in Sectors 35, 34, 25, 15 or 14
- Sector 33 if the bloodied blouse is found in Sectors 45, 44, 43, 35 or 34
- Sector 53 if the bloodied blouse is found in Sectors 52, 51, 45 or 44
- Sector 55 if the bloodied blouse is found in Sectors 56, 54, 46, 45 or 44
Lastly, a bloodied bra can be found in the sector where Brenda is held prisoner.
Rescuing Brenda
"If they get anywhere close to that lady doctor, she's gonna be disposed of immediately."
Rescuing Brenda is no easy task. There are five obstacles that will stand in your way:
- The enemy will attempt to kill Brenda if they see or hear your mercs
- Bridges leading to the island where Brenda is held are often rigged to explode
- The presence of water means you will need athletic mercs, people who are good at swimming and killing snakes
- In two of the five sectors, the doors leading to Brenda's cell are locked
- In two of these sectors there are mines buried around the island.
To rescue Brenda you need to get one of your merc in the room where she's being held. If she is still alive, a cutscene will trigger and your highest level merc will offer to accompany her back to the camp, that merc will be unusable for the rest of the day. It is not necessary (and not advised) to kill every enemies before you rescue Brenda.
General Tips
- Rescuing Brenda is a stealth operation. That means you should avoid all encounters until Brenda is safe. If time isn't of the essence, sneak (left click while holding the shift key) rather than walk.
- If you must absolutely kill someone, do it with silenced weapons, but remember, while silencers negate the firing noise of your firearms, stray bullets make noise on impact. And a silent kill does not automatically mean your presence will go unnoticed for the rest of the enemy squad.
- That being said, as soon you feel the enemy is aware of your presence, it's no use to hold onto your silencers, switch to sniper scopes to improve your accuracy.
- Equip your mercs with camouflage and sun goggles to minimize your enemy's sight range and maximize yours.
- Rescuing Brenda alive comes with a monetary reward of $15,000. If you haven't done so already, this reward is generally a good occasion to hire one of the top tier mercenaries like Magic, or Kelly if you already have a good field mechanic.
- Make sure the mercs who will cross the river are athletic, know how to swim and how to kill snakes. Also make sure they're all wielding combat knives and carry canteens of water to replenish their breath if they need to.
- Guns, explosives, electronic equipments, gas masks and kits get damaged when you swim or waddle in water. Armors, goggles, ammos, knives, silencers, scopes and canteens do not get damaged. Cut your home mechanics some slack by dropping items you won't need before crossing the river.
- If you plan to do an amphibious assault to rescue Brenda (entering an enemy sector from the sea rather than land) only bring the bare minimum number of mercs that you need for the rescue operation that day because you don't want unneeded mercs (mules and people who can't shoot or swim) to uselessly drown during the assault. And once again, make sure everyone's packing a combat knife.
- Last but not least, during the daily report at the end of the day, observe your enemy's movement. If the enemy attack one of your sector from the sector where Brenda is held captive, that means they'll have less than eight men to defend Brenda until they receive reinforcements. Should this opportunity present itself, seize it, just be careful not to get ambushed by the reinforcement.
Please note that while the strategy for Sector 24 has been tested and certified to work, the strategies for sectors 7, 33, 53 and 55 are only untested suggestions from this editor.
Sector 24
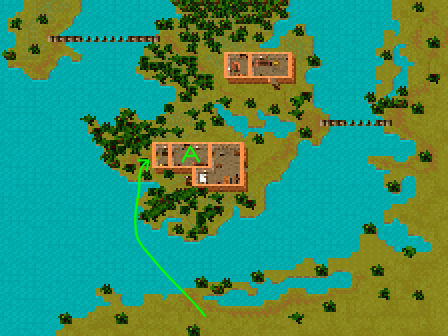
This one is fairly straight forward. Brenda is held in the back room (A) of the middle building. Fortunately there are two back doors leading to the back room. Unfortunately, these back doors are both securely locked, with Lock Strength of 58 and 61 respectively. The enemy will detonate both bridges if they detect your presence.
The general strategy is to attack from the south or south east, swim across the river with a lone, fast mercenary, armed with a combat knife and locksmith kit, reach the western side of the house, unlock the doors and rescue Brenda. Due to the monetary reward for rescuing Brenda, this is generally a good time to add one of the top tier field mechanics to your squad. Magic is a fan favorite, but if he's unavailable or out of your price range, anyone capable of killing snakes, crossing the river quickly and picking a door with Lock Strength of 61 should do the trick.
If for a reason or another you cannot hire a good field mechanic for this task, you can always have two or three athletic mercs swim across the river and blow the back doors open with grenades, just remember that once the grenades have detonated, the enemy will be aware of your presence and they will try to kill Brenda in the following turn, so you better have one fast mercenary nearby to get inside Brenda's cell ASAP. Don't worry about damaging the content of the crates, rescuing Brenda is more important. Of course if you want to retrieve the crates contents, then you have to throw the grenades well or use explosives.
Sector 7
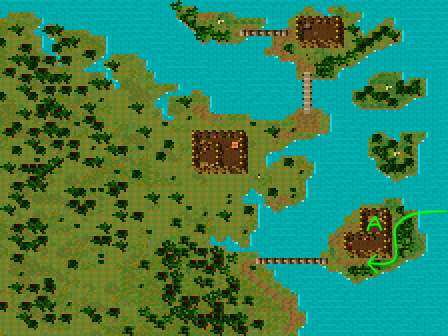
Here, Brenda is held in the back room (A) of the bottom right building. Due to the possible presence of enemies in front or inside of the house, doing an amphibious assault from Sector 8 and sneaking behind the house seems to be the safest way to pull this one off. The window on the east wall will let you peek inside to verify if there's an enemy there, just make sure the first merc to walk in front of it has the best armors. Peeking from the window will also let you interrupt the opponent's turn should someone in front of the house decides to kill Brenda.
- Beside Brenda, there is nothing of value inside the house should you decide to use explosives or eagle bombs to surprise whoever is inside.
- Bring a stun grenade or two in case there's bad guys guarding the front yard.
- None of the bridges are rigged to explode and the doors aren't locked in this sector.
Sector 33

This one is more complicated. Brenda is located in a back room (A) in the central building, and sneaking your way there from the front yard without endangering Brenda is impossible due to the combination of long bridges, lack of cover and lack of back door to reach Brenda. The safest way to rescue Brenda seems to be swimming to the western side of the island and blowing the west wall with a couple explosives. There will be a table in your way, preventing you from entering the house, but if you bring as many guns as possible on the island and stand your ground, you will be able to interrupt and shoot anyone trying to reach Brenda's cell. Once the coast is clear, you'll be able to rescue Brenda.
- To maximize the number of mercs who can shoot inside the house, bring several explosives charges with you and blow two pieces of the wall in a simultaneous explosion. Be careful not to underestimate the blast radius either.
- There are six mines in the red zone, bring a metal detector and flag them all so you don't blow yourself in the following firefight. Don't worry about disarming them, unlike in Deadly Games, the mines will not explode when you detonate the explosives.
- Due to the way the game engine handle thrown objects, throwing grenades through the hole in the wall is ill advised as they'll explode in your face, you'll have to stick with bullets here.
- Be careful not to get flanked from the north or south sides of the building.
- The east bridge is safe to cross, but the south bridge has been rigged to explode once a merc is halfway across.
- The door to Brenda cell has a 73 Strength Padlock. If you haven't hired a good field mechanic already, one of the enemy in this sector has the key to this door. I'd advise against using grenade to open the door because Brenda is right behind it.
- Since this would require an "amphibious assault" from sector 43, you may have to forfeit the Weapon Shipments mission for that sector, or let the enemy recapture that sector and then try to recapture it on Day 26.
Sector 53

This one is similar to Sector 7. Brenda is held in the house on the island (A), and an amphibious assault from Sector 54 and sneaking behind the house seems to be the safest course of action to avoid most enemies here. However, save for these two bits of lands sticking out of the red zone, the coast is loaded with mines, so bring a couple of metal detectors with you.
- On either side of the bridges are hidden switches that will detonate the bridges should your mercs walk on the switches.
- Bring a couple of stun grenades to incapacitate anyone waiting outside the house.
- The door to Brenda's cell is not locked.
Sector 55
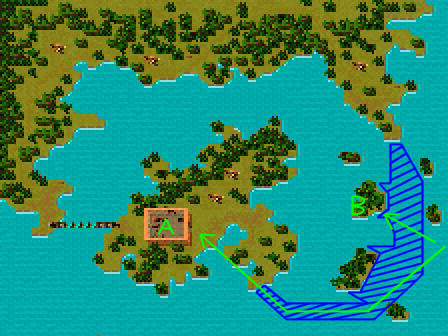
Once again, Brenda is held in the house. This one is a toughie, due to the high amount of water tiles in this map, most of the bad guys will be tightly packed on the northern landmass, making conquering be this sector from the north notoriously difficult, let alone sneak on the island without being seen. The sneakiest way to reach the island seems to be an amphibious assault from Sector 56. It may seem like a long swim but the dark blue area is a long stripe of shallow waters that connects the island to the landmass.
Divide your team in two groups: the spotters and the sniper. Your best sniper, with a M14 Rifle and sniper scope preferably, should reach the island (B) and get in position to flank anything that gets in between your spotters and Brenda's cell. In the meantime your spotters, equipped with stun grenades, sun goggles and your best armors, should make their way to the island.
There are likely more than one enemy on the island, so, if the enemy hasn't seen you yet, refrain from shooting the first guy you see until you're certain you've spotted every enemy between your mercs and the house. Until Brenda is safe, the goal is to incapacitate the enemy rather than kill them, if more than one enemy is present, concentrate your firepower on the one that's nearest to the house, if one of the bad guys is stunned, have your sniper shoot the ones that are still standing as prone enemies are harder to hit. Your most athletic and armored spotter should make its way to the house in the meantime.
- Remember that throwing range and walking speed are directly linked to one's health stat, wounded mercs, or merc with naturally poor health will have an hard time to reach Brenda's cell or throw grenades farther than their nose.
- If you haven't done so already, now would be a good occasion to mod a M14 rifle with a chunk of steel, as sniping is invaluable in clearing the island from enemy presence.
- Be careful, once you start shooting, the enemies on the northern landmass will attempt to flank your sniper, and enemies on the western side of the house will try to flank your spotters.
- Bring a lot of water canteens with you should you do an amphibious assault. The swim back and forth Sector 56 is likely to drain your mercs.
- If possible, try to exit the sector from the north, then east, rather than attempt to swim back to Sector 56, especially if one of your merc gets badly wounded during the assault.
- The door to Brenda's cell isn't locked.
Completion
Jack - "I can't thank you enough for rescuing my daughter! This is the best day of my life! I'm giving you a fifteen thousand dollar reward, in addition to my eternal gratitude!"
In addition to having Brenda back, Jack will joyfully give you a $15,000 reward for the completion of this mission. Brenda will also thank you during the ending cutscene, and some quests that require her to be alive will be available later on.